The Fine Art of Interactive Storytelling
Would you like to react to this message? Create an account in a few clicks or log in to continue.

The Fine Art of Interactive Storytelling

A place to discuss role playing ideas and ethics, storyline ideas, make plans for events and do forums RP.
 
HomeLatest imagesSearchRegisterLog in


 lost vs. blender

Go down 
AuthorMessage
lostbetween

lostbetween


Posts : 43
Join date : 2009-02-22

lost vs. blender Empty
PostSubject: lost vs. blender   lost vs. blender Icon_minitimeFri Mar 27, 2009 7:02 pm

DAY ONE

The Blender Foundation is an independent organisation (a Dutch "stichting"), acting as a non-profit public benefit corporation, with the following goals:

* To establish services for active users and developers of Blender
* To maintain and improve the current Blender product via a public accessible source code system under the GNU GPL license
* To establish funding or revenue mechanisms that serve the foundation's goals and cover the foundation's expenses
* To give the worldwide Internet community access to 3D technology in general, with Blender as a core

http://www.blender.org/blenderorg/blender-foundation/


So, ok. I am not sure if knowing that Blender did this clip is encouraging or daunting. It -is- good to learn about the Blender Foundation and see that they are maintain and improve Blender.

Now it is apparently time to learn the interface. First step, turn it on...and good, it looks like the picture in the book. I really like it when that happens. This guy is really big on hotkeys and I...am not. So I must dig out my pretty yellow highlighter. I may even swipe some of my daughter's multi-colored index tabs she puts in her pchem books for reference. Yeah, thats a good idea.

I noticed I had a second Blender thing open in my tray so i opened it.


lost vs. blender Blender01

I think it means that its happy there are no snakes about.

Blender uses non-overlapping windows. I can split my windows or move them around by right clicking on the seam. I can move it by left clecking and dragging. The seam is not tricky to find or click on. Blah-blah-blah hotkeys. On to chapter 2.

Each Blender window type can be changed into any other Blender window type. You can see all these types by left clicking on the button on the far left of the window's header.

Wow.

*daunted*

The scripts window, incidently, is where the snake goes, had we found one. We are still happy to not have one.

The most used window is the 3D view window, no surprise there. Second is the buttons window. Then we spent a long time learning/skipping how to make this panel vertical for those who are familiar with other 3D applications.

Orbiting is done by middle clicking and dragging. Weee...this is fun. I am going to assume that I will eventually learn how to plug in specific numbers to get the exact view we need for Metaplace. And learn what those specific numbers are. Panning adds hitting the shift button to the middle-click-drag. Zooming can be done with the scroll wheel or by middle-clicking and ctrl. By left clicking on the View button, I can see other ways I can view my little box. Top, front, side, whatever. We can also switch between orthographic view and perspective view here. Orthographic is similar to how blueprints are done, while perspective is more like we would see the object. *toggles between the two and laughs* I wonder how many times I will screenshot my objects in the wrong view....

*skips the numeric hotkey section*

lost vs. blender Blender02

By clicking the draw mode button I can see my box in various ways: textured. shaded, solid, wireframe, and bounding box. I am wondering if the lighting in textured mode corresponds with how metaplace walls do thier lighting or if it can be set to correspond. Or set not to have lighting at all, for my ongoing indoor lighting problems...

Selecting objects is apparently the single most troubling thing about Blender for those who have used other 3D software since we select by right clikcing instead of left clecking. Course this doesn't effect me as I am startign from scratch. We select multiple objects by Shift-right-clicking.

What left clicking does is gives you a funky crosshair curser called a 3D curser, which is apparently a unique feature of Blender. It behaves like a text editor curser does. When you want to add an object to a certain place, the curser is where it will snap to. You can also use the 3D curser to pick a new centering point by placing it anywhere and hitting the C key. (arg, another hotkey!)

lost vs. blender Blender03

Hovering over the screen and hitting Shift-S (*growls*) brings up this Snapping Menu. I will need to look at this again once I have multiple objects.

Chapter 3 is called: Getting Your Hands Dirty....EEP!
Back to top Go down
lostbetween

lostbetween


Posts : 43
Join date : 2009-02-22

lost vs. blender Empty
PostSubject: Re: lost vs. blender   lost vs. blender Icon_minitimeMon Mar 30, 2009 2:33 am

DAY TWO

The three basic object operations in a 3D scene are the transformations known by mathematicians as translation, scale and orientation.

Wait a minute…no one said there was going to be math!

Oh wait, in Blenderese this is grab, scale and rotate. OK, that sounds more familiar.

There are 4 different orientations for the coordinate system. Each orientation changes the colored arrow thingies. I remember those arrows from SL and Blender defaults to translation and I grab them in the way I am used to, straight side to side or up and down.

lost vs. blender Blender04

Note: colored arrow thingie is the 3D manipulator.

Left-click the colored arrow you want and slide the object along that axis.

Oh and next to the translation button is the rotate button and look! This is familiar too! Grab circle and spin it wherever you want!

lost vs. blender Blender05

Then next to that is scale. This one looks a little different, but its clear that this lengthens the object along the axis, equal distance from the middle.

lost vs. blender Blender07

In Blender I can also combine modes. By holding down the shift key you can activate translate and rotate at the same time. By playing with this I can see how it could be very useful in animation sequences.

lost vs. blender Blender08

To recap, left-click the translate button. Left-click the manipulator arrow. To confirm the placement, left-click again or press Enter. To undo, right-click or press Ecs. (tho this does not seem to work for me)

For quick adjustments left-click and drag. When you release the button, placement is confirmed. This is actually how I was doing it, as it was how I did it in SL.

To move in fixed increments, hold down the Ctrl key. For finer increments, press down the Shift key.

To disable being able to see the colored arrows, push the hand button. Apparently uber Blender users do this and use hotkeys to move their object around. Bah…I don’t wanna learn how to transform with hotkeys, wahhhh…..

Select the object you want to move by right-clicking it. Now press G. Ack! My object is all over the place! Too much freedom! I need my arrows! Wait, wait…ok…before it gets away, press Z. Now I have up and down line and control is regained!

lost vs. blender Blender09

Damn though…this means I have to remember the letter designation and not just the color of the line. So…to rotate press R (as in rotate). S for scale. G was for Grab.

Another quick way to lock a translation to a certain axis is to hit G for grab and then your middle mouse button. As you get to the axis you want locked on, release your mouse.

Oh wow, now this is cool. This is an even faster way. If I want to grab, I left click my mouse and drag in a straight line. When I let go, my object is in translate mode! To rotate, a drag a curve with my mouse and to scale I drag a V shape! This would be awesome for when I am using my drawing tablet too.

In addition to these hotkeys you can also use numerical input for the exact amount you want your object transformed. If you want to rotate your object 32 degrees around the global X-axis, press R, X, 32 and confirm by pressing Enter. It is also able to input numbers when using the 3D manipulator.

One of the few floating windows Blender has is the Transform Properties floating window. To activate this, go to Objects and hit Transform Properties or just hit N.

lost vs. blender Blender10

This looks similar to how I used to do fine adjustments in SL.

One thing to note about using this window is that the numbers do not change depending on what coordinate system you are in. Location is always Global, and Rotate and scale are always Local.

Tomorrow we quest into Edit Mode!
Back to top Go down
lostbetween

lostbetween


Posts : 43
Join date : 2009-02-22

lost vs. blender Empty
PostSubject: Re: lost vs. blender   lost vs. blender Icon_minitimeTue Mar 31, 2009 3:02 am

DAY THREE

You may enter edit mode one of two ways: with the mouse or with a hotkey. For the mouse, left-click the Object Mode button and choose edit Mode in the pop up menu. To switch between Object Mode and Edit Mode, use the Tab key.

lost vs. blender Blender11

Ooo…pretty purple for Edit Mode. Had to look closer, but yes there are points at each of the corners. The points are called Vertexes..vertex’….vertexi? Anyways…
The line between two vertices (huh…) is called an Edge. The Face is the polygon that is formed by 3 or 4 connecting edges. Luckily I knew what the face was cause that explanation is a bit confusing. Faces in Blender are limited to only three and four sided polygons, often refered to as tris and quads.

For editing polygons, there are three different types of Edit Modes: Vertex Select, Edge Select and Face Select. Default goes to Vertex Select Mode.

lost vs. blender Blender12

You can tell you are in Vertex Select Mode because the points are there, but also because the Vertex button is selected. Next to it is the Edge Select and Face Select. Like the 3D Manipulator, you can activate more than one mode by pressing the Shift Button. If you want to use hotkeys (no!) to switch between modes you can press Ctrl + Tab and you get a menu that allows you to switch between modes.

By default, when you enter into Edit Mode all vertices are selected. You select or deselect by right-clicking them. Multiple vertices can be selected by Shift-right-clicking on them. Large groups can be selected by using the Border Select Tool (press B) or Brush Select Tool (press B and then B). Left click and drag to add to your selection. Blender also has a Lasso Select Function. To use this Ctrl+left-click and drag around the vertices.

Ack, how can you people remember all these hotkeys!

Oh and here’s a tip. If you want to select everything in Object Mode, or all vertices in an active object in Edit Mode, you can do so by pressing A. This is a toggle.

If I have two cubes and I want them both selected, place the mouse near any of the vertices in the unselected cube and press L. Then to deselect one of the cubes, place the mouse near a vertex of the one you want deselected and press Shift-L.

Enough hotkeys? Maybe?

The button next to the the Face button is the Occlude Background Geometry button. When this button is pressed you will be blocked from accidently selecting a vertex on the back side of your object. It will hide those vertices and edges from you.

Blender’s number one modeling tool is Extrude!
Think pushing play-doh through those plastic things to make shapes. That’s extrusion.

1. Select the object you want to edit by right-clicking it.
2. Tab into Edit Mode.
3. Select the vertices, edges or faces you want to extrude.
4. Press E to extrude your selection.

After you extrude your selection, Blender automatically puts you back in Grab mode, constraining the extrusion along its normal…whatever that means. The advantage of this is that you have all the transform functionality immediately available to you. The disadvantage is that if you cancel your extrusionby right clicking or Esc, the new extrusion is still there, just located in exactly the same place as the vertices that they originated from.

So, if you cancel an extrusion, it is a good idea to make sure your duplicate vertices, often called doubles, are no longer there. Press G after you have canceled. If it looks like you are extruding again, you have doubles.

1. if you still have the doubles selected, delete them by pressing X or Del and choose Vertices from the popup menu.
2. If the canceled extrusion operation was the last thing you did, undo it by pressing Ctrl+Z.
3. If you are unsure whether you have doubles from previous canceled extrusions, follow these steps to use Remove Doubles Function:
a. In Edit Mode, select all by choosing Select, select/Deselect All from the 3D View header or pressing A until all the vertices are selected.
b. Press W, Remove Doubles and Blender removes all doubles from your mesh.


lost vs. blender Blender13

I played around a bit with extruding edges, but my brain is a bit too blended to accept any more new information. I think it may be time to go kill some blood elementals.
Back to top Go down
lostbetween

lostbetween


Posts : 43
Join date : 2009-02-22

lost vs. blender Empty
PostSubject: Re: lost vs. blender   lost vs. blender Icon_minitimeThu Apr 02, 2009 11:37 pm

DAY FOUR

To perform quick extrusions, follow these steps:
1. Select your object and Tab into Edit Mode
2. Select the vertices, edges, or faces you wish to extrude
3. Ctrl+left-click where you would like the extrusion to end.

Although this method is nice for roughing models, there are times when there is a benefit to using the E key to extrude for it gives you quick access to other transform tools. Now I will follow their steps to make a skyscraper from a single plane.


lost vs. blender Blender14

I notice right away that I am not getting it right and I’m not really surprised. They are throwing a lot of keystrokes at me that I don’t really understand yet.

lost vs. blender Blender15

Can’t say my second attempt went any better. Let me take a closer look. My first problem was that using the numpad 3 didn’t do anything so I was going to the side view manually. So I looked for a key that must be assumed I know controls the numpad. With me folks…don’t assume anything. Numlock seems to have done the trick.

Next it says to translate everything by one unit in the positive Z direction. First of all I am not sure exactly what this does, or why we are doing it. After thinking a moment, I think I remember translate is another word for Grab. So we are moving everything….up? Oh…ok. This puts my box on top of my ‘ground’ instead of half way in the middle of the grid plane. Yay cause that’s where I want it! Now I will opt to switch to Face mode with my mouse. Problem with key commands is my problem with typing the wrong keys. You all have seen my typing skills..

Right click on the top face and delete it by using X-Vertices. I with do this with the keys cause one must be careful with deletions.

lost vs. blender Blender16

Woo! Ok, I have a flat plane on my ground!

Multi-subdivide with two cuts by W-Subdivide Multi-2-Enter. This is the first I remember using W, but it brings up an option list and I choose the right thing and set it to 2.

lost vs. blender Blender17

so far so good. Now switch to Edge Mode and select the edges that form the corners of the plane…oh….I was selecting the corners her before…as in the vertices. *V-8 smack* Now for another confusing part. We want to extrude out to the sides just a little bit. So it says to Extrude the edges and scale them 1.1 in the XY plane. In my mind, being ex-SL I think in terms of ground and EW, NS. But I am not sure what Shift Z does, so I look at the charts. Can’t find it so I am guessing this is what it does…pushes the extrusion east/west/north/south.

lost vs. blender Blender18

While the region is still selected….oops. OK, I have to use Occlude Background Semetry to reselect the region as I kept selecting things I didn’t want. Now, extrude but scale the region by 0.9 on the XY plane. So this should make the next floor of the skyscraper be smaller.

lost vs. blender Blender19

This was working fine until I got to the pyramid at the top. And I don’t know how to undo, darnit

lost vs. blender Blender20

After running screaming to Twitter and messaging Rob and KS, I finally found undo in the book.
Ctrl-Z…I know I will be using it a lot! So there is my squatty skyscraper!
I learned how to use extrusion with transform tools to add to speed and flexibility.

Mmm…strawberries and scones….

Now where was I? Primitives! Yes we have more than just a cube to work with! Primitive is word
I am used to from SL as well. It’s a starting shape you can choose. I will be using the toolbox,
Which is accessed by hovering my mouse in 3D view and pressing the Spacebar.

lost vs. blender Blender21

Add: this is where all the primitives live.
Edit: a variety of editing options depending on the context of what you are doing
Select: selection options
Transform: nearly all transform options already discussed
Object: things like copying, linking, parenting (!!!) and moving layers.
View: angle views and playing back animations.
Render: options for generating final output.

This toolbox gives you access to almost all Blenders functions but it is not as fast, but is
Is good to know if, for example, you are using a tablet.

Under Adding Objects we have:
Mesh: polygon-based objects
Curves: have control points instead of vertices which can be edited.
Surface: similar to mesh but defined as a set of NURBS curves.
*rubs eyes to keep them from glazing over*
Meta: unique primitives that have the cool ability to melt into one another.
Text: text object
Empty: invisible object used to as reference point.
Group: sets of objects
Camera: define the location and perspective of a scene
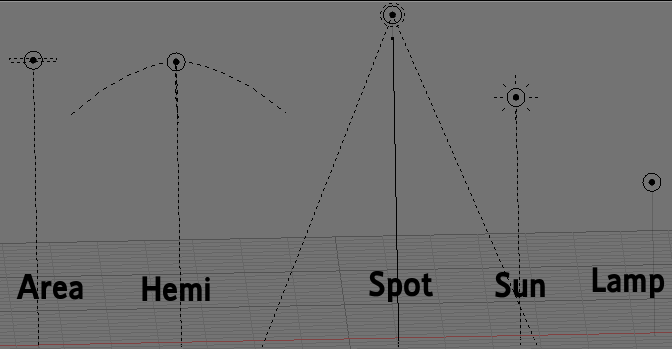
Lamp: lighting for your scene
Armature: skeleton structures
Lattice: used to do other forms of deforming.

When adding new objects, be aware of whether you are in object mode of edit mode.
If your in edit mode your object will have to be the same kind of object as the one
You are editing. If you are in Object Mode, this will not happen.

Now, press Spacebar-Add-Mesh-Monkey

lost vs. blender Blender22

This is Susanne!

Now if I accidently add my new object while in Edit Mode and need it to be separated from
The original object I can press P-Selected. Unfortunately when I press P the program seems
To lock up, but the other blender window says its gone into game mode.

So to get linked objects I added the object while I was Edit Mode so I could go on with the
Instructions.

lost vs. blender Blender23

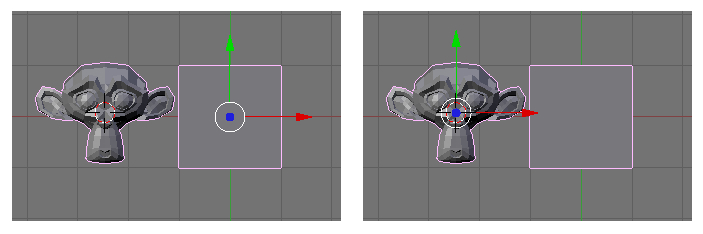
Tab back to Object Mode and right click your new object to select it. Notice the center is still
Located in the same place as it was when you had one object. If you want it centered on the new
Object on its actual center, press Spacebar-Transform-Center New. You can also specify the
Center to be where your curser is by pressing Spacebar-Transform-Center Cursor.

Now if you have multiple objects you want to join, select them all and Ctrl-J to join them. The
Last object you selected will be considered your Active Object. In SL we called it the Root
Object, I believe. You can only join objects of the same type.

lost vs. blender Blender24

Earlier we learned how to duplicate in Edit Mode. You can also do this in Object Mode.
(Shift-D or Spacebar-Edit-Duplicate)
Linked duplicates are useful if you want the duplicate to be the same as the original in Edit mode
Sometimes called instanced copies.

1. Select the object you wish to duplicate by right-clicking it.
2. With the object selected, press Alt-D or Spacebar-Edit-Duplicate Linked
3. from here, the behaviour is the same as a regular duplication.

The easiest way to determine that your duplicates are linked is to Tab to Edit mode and edit the first object and see if the linked object moves in the same way.

lost vs. blender Blender25

I switched back to a simpler object for this.

lost vs. blender Blender26

Another way to check that they are linked is to split the 3D window and change the window type to to Outliner by pressing Shift F9. Then change View to Show Oops Schematic.

Blah-blah-blah object data. Time to play around a bit.

lost vs. blender Blender27

I want to make something. It can be simple and whats more simple than a table? I of course had to look up again how to use my manipulator tools, but I made my table top and one leg. Now I will try to duplicate that leg and link them! Oops I duplicated them in Edit Mode.

Undo, undo, undo.

This time I will duplicate the cube before I make it into a table leg.

lost vs. blender Blender28

Its going to take me awhile to remember what does exactly what, but I got legs. Now I know I want to attach the top last so it’s the Active object…

lost vs. blender Blender29

Why do I always want to make things harder than they are? After following some false trails and accidently unlinking my table legs I remembered about Shift-J and just joined them all together, selecting the table top last to be my Active Object! After a quick rotation, I have a table!
Back to top Go down
lostbetween

lostbetween


Posts : 43
Join date : 2009-02-22

lost vs. blender Empty
PostSubject: Re: lost vs. blender   lost vs. blender Icon_minitimeFri Apr 03, 2009 10:44 pm

DAY FIVE

I tried again to read through the detail-y information about data blocks and linked stuff, but its too much without a way to visualize it. I will simply try to remember that there is a section which explains how to make your linked objects share this and that, but not that other thing.

Onward.

Discovering parents, children, and groups.

Hm…I had thought the parent/children thing was scripting since I notice it come up in POC with all there scriptor-ese chatter. Apparently, its another way to link objects that develops a hierarchy. *sighs* And here I thought I was done being a mother…
An object can have any number of children, but no object can have more than a single parent. Unlike linking, they do not have to be the same type.

To do this, select all your objects, your last selection (the Active Object) will be the parent. Press Ctrl+P or Spacebar-Object-Parent-Make Parent.

So if you have a table and 4 chairs, you can parent the table to the chairs. Then if you have to resize them, just resize the table and the chairs go along for the ride.

lost vs. blender Blender30

This is all fairly easy to understand, but I couldn’t resist the opportunity to crank up Blender and make me some chairs to go with the table I made yesterday.
To remove a child from a parent, press Alt-P and this brings up a pop up menu with three options.
-Clear Parent removes the child/parent relationship and the object snaps back to its original size.
-Clear and Keep Transformation behaves the same but the transformation stays.
-Clear Parent Inverse actually does not remove the child/parent relationship. They stay linked but the child loses its transformation.

Sometimes you want objects together but parenting is not wanted. So instead we will use grouping. To create a group, select all the objects and press Ctrl+G-Add to New Group. All the objects in the group will have a green outline instead of pink. Also an object can be a member of more than one group, where in parenting and object can only have one parent. Now when you press Ctrl+G you have some option:
-Add to Existing Group, which will bring up another menu of the existing groups.
-Add to Active Objects Group: to do this, select all your objects, select the Active Object of a group then press Ctrl+G-Add to Active Objects Group. Then your objects will be a member of the group the Active Object is in.
-Add to New Group creates a new group.
-Remove from Group
-Remove from all Groups

When you use parenting and groups, you gain the ability to rapidly select your objects according to their groupings. To do this, press Shift+G and you get a pop up menu.

lost vs. blender Blender31

-Children adds all of that object’s children to the list of selected objects.
-Immediate Children does the same except it traverses down the hierarchy by one step only. Children of children are not added to the selection.
-Parent
-Siblings is for selecting all the children of a single parent.
-Objects of Same Type
-Objects on Shared Layers to select objects that live on the same layers
-Objects of Same Group
-Object Hooks (except they haven’t explained what hooks are yet…)
-Object PassIndex….(erg)

To save a file, choose File-save As or use F2 hotkey. Once its been saved once, all you have to do is choose File-Save. Now if we want to save progressive steps if a file, there is a quick way to do that. F2-+-Enter and the + will automatically appendage your file with the next number in sequence.

lost vs. blender Blender32

My first thought was that I really don’t mind typing out the sequence numbers myself. But then I remembered all my mistyped sequencing that litters my files and decided to give it a try. As you can see, I forgot to name my table file from yesterday, so when I saved it this way it is still untitled.

Now what is I want to open a file but include it in the scene I am now working in? You mean like earlier when I made my chair and ended up having to make it a second time? Oh yeah…
To do this, choose File-Append from the main header. This will bring you to the browser where you will pick your file. Then you can select the data from that file and bring it into the file you are working on.

lost vs. blender Blender33

Sounded easy enough but I wanted to try it out just to make sure I had it. Better now than when I am working with files I spent hours on, right? So I opened a new file and made a simple book, then tried to append the table in from the first file. I can easily see my choices in this case since my files do not contain a lot of stuff.

lost vs. blender Blender34

One thing they say to note is that at the bottom of the browser there are two buttons that toggle. One says append and the other says link. Append is the default. If you use link, then whatever changes you make in this file will be made in the other file too.

And that’s the end of Part One and Chapter Four!
Back to top Go down
lostbetween

lostbetween


Posts : 43
Join date : 2009-02-22

lost vs. blender Empty
PostSubject: Re: lost vs. blender   lost vs. blender Icon_minitimeSun Apr 05, 2009 5:56 am

Chapter five is about meshes. Read it.

Chapter six is about non-mesh primitives. Read it. Mostly. Sorta.
Man, this just doesn’t stop being really detail-y, does it? I finally feel like I can muddle through it, with a little help. But what I really want to do right now is texture my table. That would make me really, really happy.

Oh yes…Chapter 7, Changing that Boring Grey Default Material. *rubs hands together*

The easiest way to change the look of an object is to adjust its material. You can do this with the Shading Buttons (press F5).

lost vs. blender Blender35

The button here we are starting with is the Materials Button, which is the red sphere. By default we get this grey plastic material. The settings for this material are shown here in five blocks of panels.

lost vs. blender Blender36

Preview gives you the option of seeing the settings on a variety of objects. Links and pipeline creates new datablocks and controls how they link and also dictates how materials are rendered.

lost vs. blender Blender37

Material is where the controls are for color, transperancy and rendering properties. Shaders controls the way colors react to light. Texture is pretty self explanatory.

Out of all of these, Links and Pipelines give you the most control over materials. Left to right:
-up and down changes the material
-Datablock name lets you custom name the material
-Left-clicking this button creates a copy of the material that is used only by the active object
-X disconnects the material block from the active object
-The little car automatically creates a name for your material
-F creates a fake user so it doesn’t get deleted

Then there is talk about how blend files work again and by looking at the Oops thing you can see that you can link a material to either the mesh or the object. Say you have a bunch of linked objects that share the same mesh data. If your material is linked to the mesh, they will all have the same material. Yadda-yadda..

Now lets change colors!

There are three different types of colors to set.
-diffuse: the first color block, labeled Col is the primary color.
-specular: Spec controls the color of the highlights.
-mirror: the tint of color your reflections will be if you turn on reflections

lost vs. blender Blender38

To actually change the color, left-click the color block next to the type of color you want to set up and your color picker will pop up. Pick, slide and play until you have the color you want.

lost vs. blender Blender39

yay!

Now lets play with the shaders. Move over a couple panels and click the shader tab. By default it is set to Lambert, but there are other options:
-Lambert: this general purpose shader only has one adjustable setting and that is reflection.
-Oren-Nayar: similar to Lambert but has a roughness setting
-Toon: reproduces hard edged cel shading seen in traditional animation
-Minnaert: it starts like Lambert but you can use the dark setting affect certain looks like velvet or shiney metal.
-Fresnel: similar to Minnart but works relative to the light source.

Now unlike changing the color, the effects are changing in the preview but not in my object. There are also settings for reflections and transparency, but again, it is not applying, so I will pause here. Also I note that UV maps are coming up next and well….no. Perhaps I shall look at the Textures section.

Ok…you can add textures by going to the texture panel F6.

lost vs. blender Blender40

There is a preview panel where you can see your texture as you work on it. It defaults to none. You can change this with the drop down menu on the right side. The left side is very similar to the materials panel where you can name your texture.

There are two types of textures in Blender, image based and procedural, which are created by a specific pattern algorithm. The advantage to this is not having to worry about cleaning up seams from tiling errors.

lost vs. blender Blender41

Blender has 11 procedural textures to work with, accessible through the Texture Type drop-down list menu. In addition you can also choose Plugin, Image, or None as textures. With only a couple of exceptions when you choose one, a third panel appears that gives you more control over things like smoothness and noise.

Hm…once again I am not getting the effect in my object that comes up in the preview. Let me do some asking around and finish this up later.
Back to top Go down
lostbetween

lostbetween


Posts : 43
Join date : 2009-02-22

lost vs. blender Empty
PostSubject: Re: lost vs. blender   lost vs. blender Icon_minitimeThu Apr 09, 2009 4:31 am

DAY SEVEN

Ok, lets try this again.

Procedural Textures.

F6 takes you to the Texture Panel.

lost vs. blender Blender47

On the right there is a pull menu of texture types. I picked marble.

lost vs. blender Blender48

Most of these choices bring up another panel to the right of that one. In the lower left of this panel is the Noise Basis.

lost vs. blender Blender49

This is the CellNoise choice.

lost vs. blender Blender50

This one of from the Voronoi family.

lost vs. blender Blender51

This one is from the Cloud noise group, which includes Improved Perlin, Original Perlin and Blender Original Noise. These tend to be more organic.

Then I pressed F5 to go to the Material Panels.

lost vs. blender Blender52

On the rightmost panel press the map input tab. Here we have several buttons that mean things I don't understand. There is: Glob, Object, UV, Orco, Stick, Strand, Win, Nor, Refl, Stress, and Tangent. This is what UV looks like.

lost vs. blender Blender53

This is what Refl looks like.

lost vs. blender Blender54

This is what Win looks like. You can also set the texture projection. This also helps control how the texture is applied. Since I have a table, I chose Cube. Other choices were Flat, Tube, and Sphere.

lost vs. blender Blender55

Now I hit the Map To tab. The top two rows of buttons are toggle buttons that effect different types of color and shaders.
COL: affects materials diffuse color
NOR: influences the direction of the surface normals on the material
CSP: affects material's specular color
CMIR: affects the materials mirror color
REF: influences the reflection value in the materials diffuser shader
SPEC: influences the specularity in the materials specular shader
AMB: affects the amount of ambient light the material gets
HARD: affects the specular hardness values for specular shaders that support it
RAYMIR: influences amount of raytraced reflection the material has
Emit: affects materials emit value for radiosity
TRANSLU: affects the amount of translucency in the material.

lost vs. blender Blender56

Again, I don't understand all that but just went around pushing buttons. And I changed the color.

lost vs. blender Blender57

Then I went to a wikibook on Blender and found some sets of settings for various things and tweaked my settings back in the Texture Panel.

lost vs. blender Blender58

And a few settings back in the Materials Panel and this is what I ended up with!

lost vs. blender Blender59

Ok, so the lighting is bad, perspective and angle is wrong. But its a marble table!
Back to top Go down
lostbetween

lostbetween


Posts : 43
Join date : 2009-02-22

lost vs. blender Empty
PostSubject: Re: lost vs. blender   lost vs. blender Icon_minitimeMon Apr 13, 2009 11:03 pm

DAY EIGHT

Lighting and Environment!

Setting up a three-point lighting system starts with placing your subject at the center of a scene and aiming your camera at the subject. Then you set up your main light or ‘key light’. This will be the most powerful light in the scene. Its where your main shadows will come from as well as your brightest highlights. Typically you will set this light to the left or to the right of the camera and usually higher than your subject.

Then you want to place your ‘fill light’. The purpose of the fill light is to brighten up the dark spots and keep your shadows from obscuring your subject. The fill light tends to be less powerful than your key light, but you want it to be wider and more diffused. Normally you would place this on the opposite side of the camera as the key light and roughly the same height as your subject.

lost vs. blender Blender60

The last light is the back light or ‘rim light’. This light shines on the back of your subject, creating a small edge of shine around the profile. This sliver of light helps separate the subject from the background. It may be placed opposite the key or the camera. But if your subject moves, the camera could get blinded. Placing it opposite the fill can make it look a little unnatural.

To add a new light, use Spacebar-Add-Lamp.

Choose between:
-Lamp: sometimes called a point light or omni light, it is in a fixed location and eminates light in all directions.
-Sun: a single universal light that comes from one direction
-Spot: works like a flashlight and gives you the most control
-Hemi: like Sun only softer and flatter and does not cast shadows
-Area: powerful and similar to spot but shadows tend to be softer and more accurate because they are based on a grid of lights.

lost vs. blender Blender61

This is what they look like inside Blender.

lost vs. blender Blender62

When you have chosen a type of lamp and added it to a scene, the controls are in the Lamp buttons, which is a subcontext of the Shading buttons. Or you can press F5 with the lamp selected.

lost vs. blender Blender63

The Energy value and RGB sliders control the strength and color of the lamp. Usually the energy is fine set at 1. If you want to hue the light then click the color swatch and use the color picker.

The Dist value is available for all types, but really only has value for Lamp, Spot and Area. If an object is further away than this distance, it receives no light.

Each light has some specific options that give various effects which I will not go into.

The next six buttons are the ‘cheat’ buttons and are useful in creating effects that are difficult or impossible in the real world.

-Layer: illuminates only the objects in that layer.
-Negative: inverts the light shine into a dark shine.
-No diffuse: if you turn off shadow casting and turn this on, you get a specular hightlight that you can move around.
-No Specular: used to reduce the highlights produced by the fill
-OnlyShadow/Layer: may cast shadows without adding more light.

lost vs. blender Blender64

The example in the book said to make the key light a buffered Spot with all settings at default except to make the size 60 and activate the Clip start and end values (which I could not find). Make the fill a Hemi with an energy of .5 and the NO Specular button enabled. The back light is also a Hemi with and energy of .75.

lost vs. blender Blender65

And this is what I ended up with!
Back to top Go down
Sponsored content


lost vs. blender Empty
PostSubject: Re: lost vs. blender   lost vs. blender Icon_minitime

Back to top Go down
 
lost vs. blender
Back to top 
Page 1 of 1

Permissions in this forum:You cannot reply to topics in this forum
The Fine Art of Interactive Storytelling :: Metaplace :: Metaplace Tutorials-
Jump to: